The Ultimate Chocolate Chip Cheesecake: A Decadent Delight from My Kitchen
Chocolate Chip Cheesecake – There are some recipes that simply etch themselves into your memory, becoming synonymous with comfort and celebration. For me, that timeless delight is this incredible Chocolate Chip Cheesecake, a dessert born from a slightly sunken, definitely cracked, but still delicious disaster during my first ambitious attempt for my grandmother’s birthday.
Thank you for reading this post, don't forget to subscribe!Through countless experiments and a few glorious kitchen triumphs, Bake Mode finally cracked the code to what I now affectionately call The Smile-Maker cheesecake, a true labor of love that brings the same pure joy as our beloved Heart-Shaped Raspberry Brownies. The feeling of pulling this perfectly golden beauty from the oven, knowing the creamy, chocolate-studded dream beneath awaits, is a sensation I chase every time I bake.
This isn’t just a dessert; it’s a masterpiece that has graced every significant family celebration, earning its legendary status as a hug in every decadent bite. While this is my ultimate version, if you’re curious about other fantastic takes on this classic, you might also enjoy checking out the chocolate chip cheesecake recipe on Taste Charm for more inspiration, as this Chocolate Cheesecake is destined to become your family’s forever favorite too.

Mastering the Crust for Your Chocolate Chip Cheesecake
Every masterpiece starts with a solid foundation, and for our Chocolate Chip Cheesecake, that means a perfect crust. Bake Mode discovered a rich, dark chocolate cookie crust isn’t just a base; it’s an integral layer of flavor and texture, providing delightful crunch against the creamy filling. The secret? Pulsing cookies just right and pressing firmly into your springform pan. A brief pre-bake ensures it’s set, ready to hold up to the luscious filling. This step is crucial for a harmonious balance in every bite of your Chocolate Cheesecake.
Crafting the Creamy Dream: The Chocolate Chip Cheesecake Filling
Now for the star: the filling. This is where the magic truly happens. Bake Mode learned the key to an impossibly smooth and creamy Chocolate Chip Cheesecake is room temperature ingredients and gentle mixing. Over-mixing introduces too much air, leading to cracks. We incorporate generous mini chocolate chips, ensuring a delightful surprise in every forkful. Vanilla bean paste adds depth, complementing the cream cheese and chocolate. This filling isn’t just a component; it’s the very soul of your Chocolate Cheesecake.
The Bake Mode Guide to a Crack-Free Chocolate Chip Cheesecake
Ah, the dreaded cheesecake crack. It’s a common kitchen foe, but Bake Mode has a tried-and-true method to conquer it for your Chocolate Chip Cheesecake. The water bath, while sometimes intimidating, is your best friend. It provides moist, even heat, preventing the cheesecake from baking too quickly and drying out. Don’t rush cooling – letting your Chocolate Chip Cheesecake gradually cool in the oven, then on the counter, and finally in the fridge, is paramount. Patience is key for that flawless surface. Now, let’s bring this memory to your kitchen…
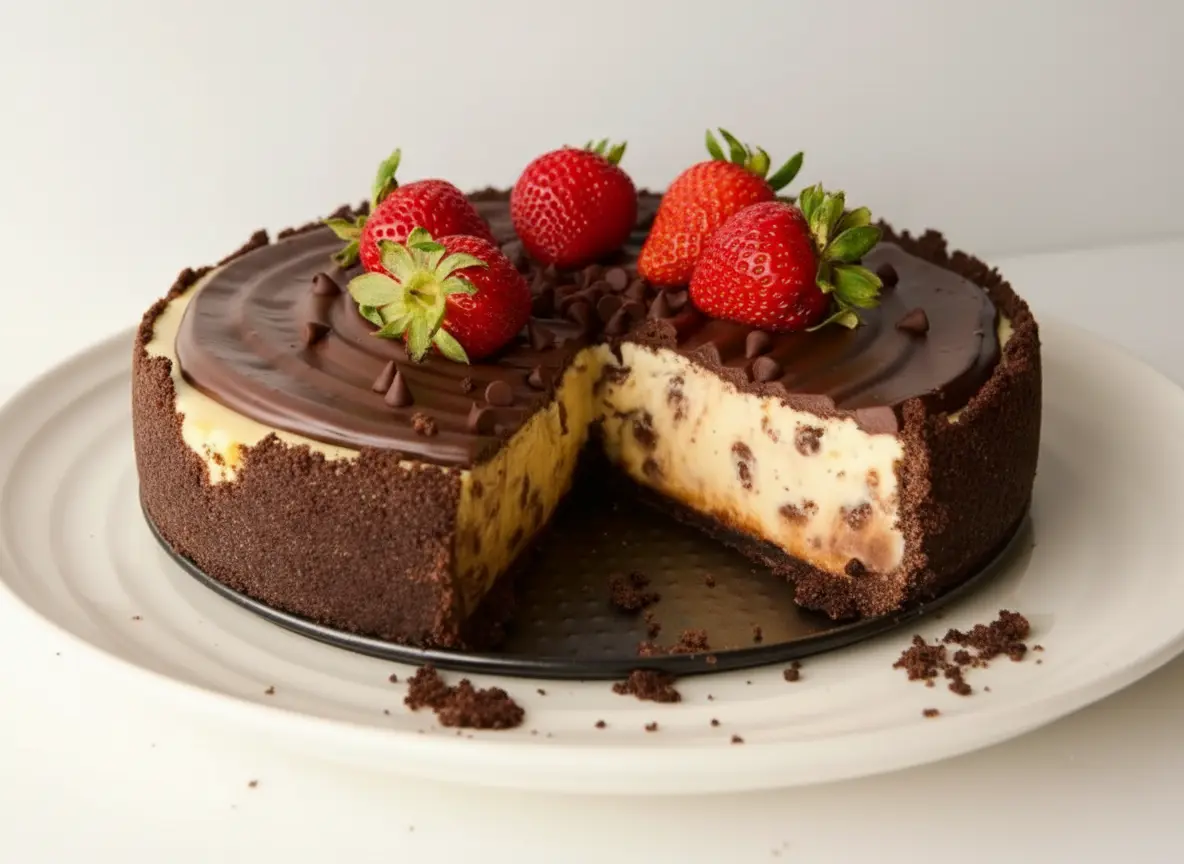
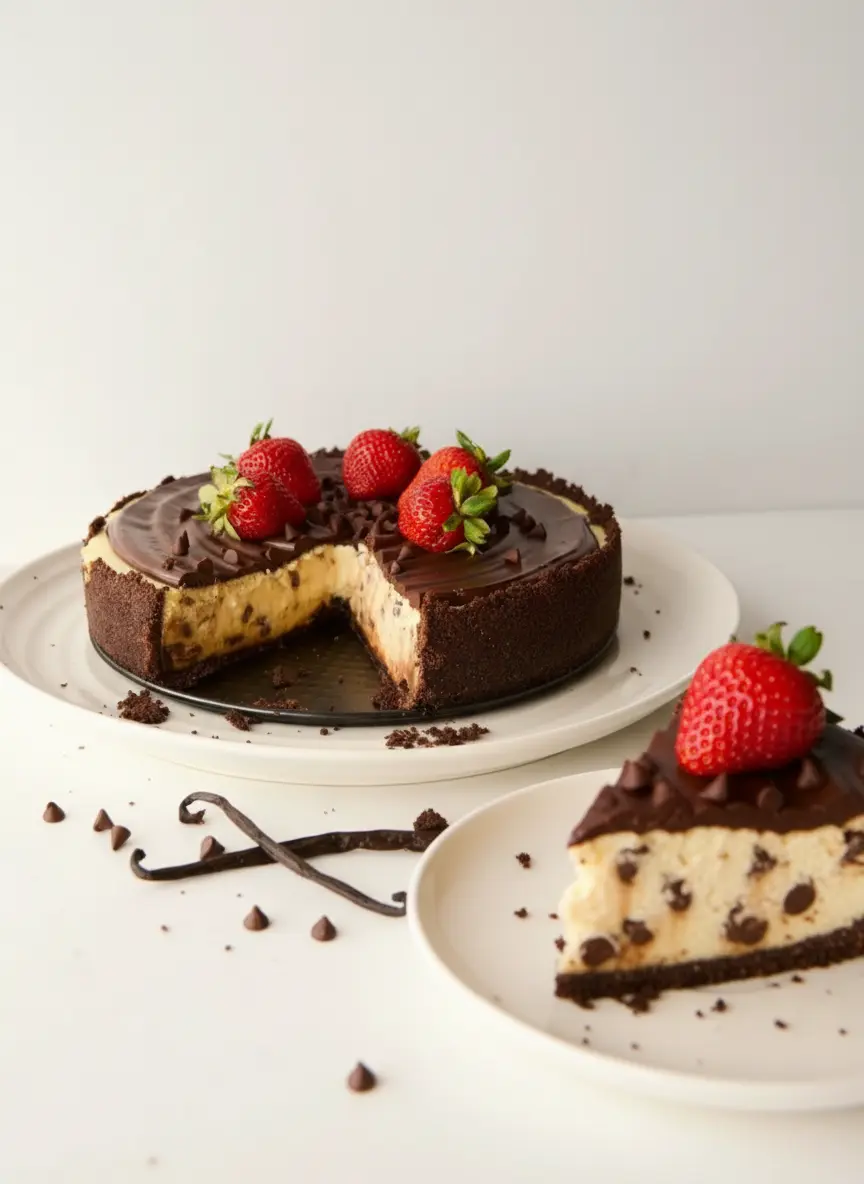
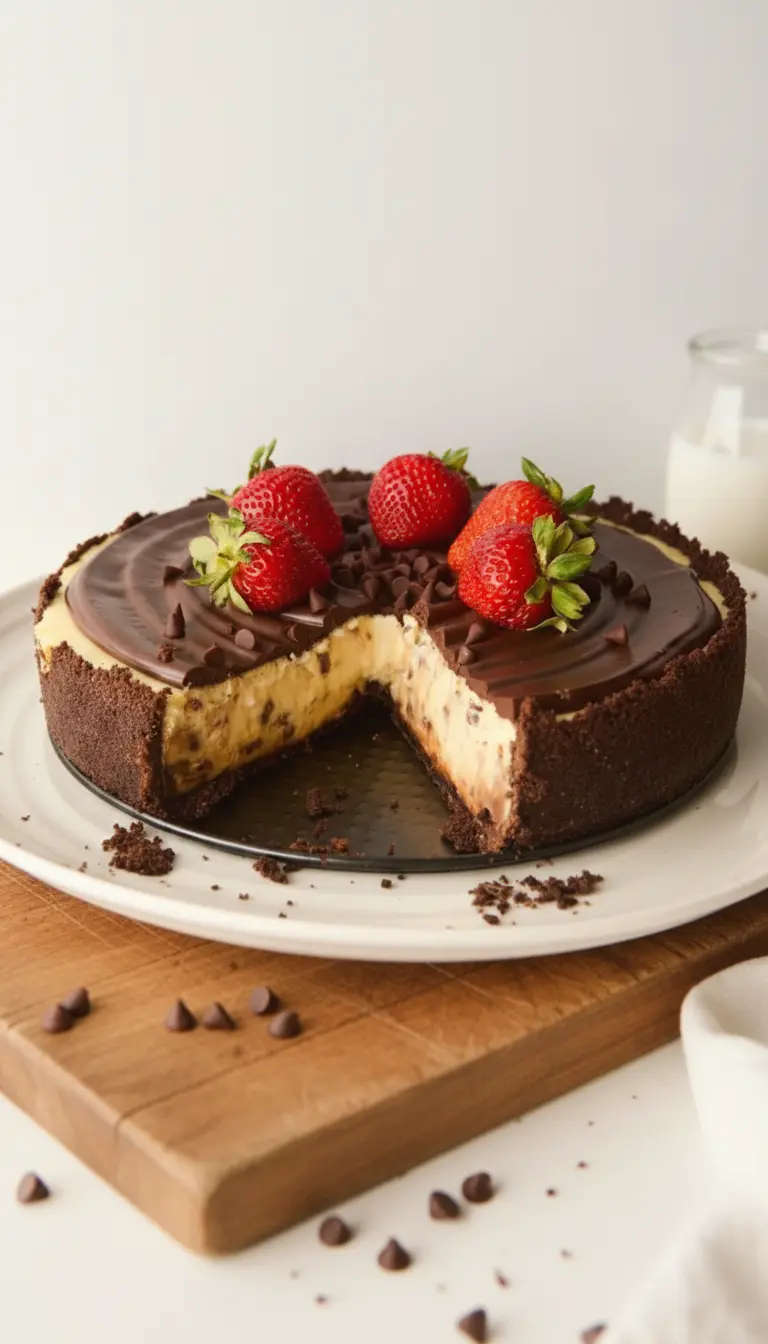
Dressing Up Your Chocolate Chip Cheesecake: The Ganache & Garnish
Once your Chocolate Chip Cheesecake is perfectly set and chilled, it’s time for its grand finale: the rich chocolate ganache. This silky, pourable topping adds another layer of deep chocolate flavor and a beautiful, glossy finish. Taste Charm comes alive here, transforming a simple dessert into an elegant showstopper. We spread it lovingly, creating signature swirls, then scatter extra mini chocolate chips and fresh strawberries for a burst of color and freshness. This truly elevates the entire Chocolate Chip Cheesecake experience.
Storing and Serving Your Perfect Chocolate Chip Cheesecake
You’ve put in the love, and now it’s time to enjoy the slices of your magnificent Chocolate Chip Cheesecake! To ensure freshness, store it in an airtight container in the refrigerator; it tastes even better the next day as flavors meld. When serving, a warm, clean knife makes for the cleanest slices. Bake Mode always recommends letting it sit out for 15-20 minutes before serving to achieve that ideal creamy texture. Each slice of this Chocolate Chip Cheesecake is a testament to homemade goodness, ready to create new memories around your table.
The Ultimate Chocolate Chip Cheesecake: A Decadent Delight from My Kitchen
Course: DessertsCuisine: AmericanDifficulty: Medium4
servings30
minutes40
minutes300
kcalA rich and creamy Chocolate Chip Cheesecake featuring a dark chocolate cookie crust, a luscious cream cheese filling studded with mini chocolate chips, and topped with a silky chocolate ganache and fresh strawberries.
Ingredients
For the Crust:
1 ½ cups chocolate sandwich cookie crumbs (about 18-20 cookies)
¼ cup granulated sugar
¼ cup unsalted butter, melted
For the Filling:
3 (8-ounce) packages cream cheese, softened
1 ½ cups granulated sugar
¼ cup all-purpose flour
1 teaspoon vanilla extract
½ teaspoon vanilla bean paste
Pinch of salt
3 large eggs, at room temperature
1 cup sour cream, at room temperature
1 cup mini chocolate chips
For the Chocolate Ganache:
½ cup heavy cream
4 ounces semi-sweet chocolate, finely chopped
For Garnish:
Fresh strawberries
Extra mini chocolate chips
Directions
- 1. Preheat your oven to 350°F (175°C). Wrap the bottom of a 9-inch springform pan with heavy-duty aluminum foil to prevent water from seeping in during the water bath.
- 2. Make the Crust: In a medium bowl, combine cookie crumbs, sugar, and melted butter. Press the mixture firmly into the bottom of the prepared springform pan. Bake for 10 minutes, then remove from oven and let cool slightly. Reduce oven temperature to 325°F (160°C).
- 3. Prepare Water Bath: Place a large roasting pan on the middle rack of your oven. You will place the springform pan inside this roasting pan later.
- 4. Make the Filling: In a large bowl, using an electric mixer on medium speed, beat the softened cream cheese until smooth and creamy, about 2-3 minutes.
- 5. Gradually add the granulated sugar and flour, beating until just combined. Mix in the vanilla extract, vanilla bean paste, and salt.
- 6. Add the eggs one at a time, beating on low speed after each addition until just incorporated. Do not overmix. Stir in the sour cream until smooth. Gently fold in the mini chocolate chips by hand.
- 7. Pour the filling over the cooled crust in the springform pan. Carefully place the springform pan into the larger roasting pan in the oven. Pour hot water into the roasting pan until it reaches halfway up the sides of the springform pan.
- 8. Bake for 60-75 minutes, or until the edges are set but the center still jiggles slightly.
- 9. Turn off the oven, prop the oven door open slightly, and let the cheesecake cool in the water bath for 1 hour.
- 10. Remove the cheesecake from the water bath and roasting pan. Carefully remove the foil. Let it cool completely on a wire rack at room temperature for another 1-2 hours.
- 11. Once cooled, cover loosely with plastic wrap and refrigerate for at least 4 hours, or preferably overnight, until thoroughly chilled and firm.
- 12. Make the Ganache: In a small saucepan, heat the heavy cream until just simmering. Remove from heat and pour over the chopped semi-sweet chocolate in a heatproof bowl. Let sit for 5 minutes, then whisk until smooth and glossy. Let cool slightly until it thickens to a pourable consistency.
- 13. Carefully remove the chilled cheesecake from the springform pan. Pour the ganache over the top of the cheesecake, spreading it gently to the edges. Garnish with fresh strawberries and extra mini chocolate chips. Slice and serve!
Notes
- Ensure all dairy ingredients (cream cheese, eggs, sour cream) are at room temperature for a smooth, lump-free batter.
- Do not overmix the batter once the eggs are added; this can incorporate too much air and cause cracking.
- The water bath is crucial for even baking and preventing cracks. Make sure your springform pan is well-wrapped with foil.
- Allow the cheesecake to cool slowly, first in the oven, then at room temperature, and finally in the refrigerator. This gradual cooling is key to a perfect texture.
- For clean slices, run a sharp knife under hot water and wipe it clean between each cut.